Discover the best honey glazed chicken recipe with simple ingredients, expert tips, and step-by-step instructions. A quick, flavorful weeknight dinner the whole family will love. Ready in under 30 minutes!
Can I be honest with you? Some nights, I just need a recipe that delivers big flavor without turning my kitchen into a disaster zone.
That’s exactly why honey glazed chicken has become one of my most-reached-for recipes. It’s the kind of dish that looks impressive enough for guests but comes together fast enough for a Tuesday night.
The combination of golden seared chicken, sticky honey, garlic, and a little tang from apple cider vinegar is just… magic. If you love that honey-garlic combo as much as I do, you’ll also want to check out my one-pot honey garlic chicken and rice, it’s a full meal in a single pan and just as weeknight-friendly.
My kids ask for honey glazed chicken almost every week. And honestly? I never get tired of making it.
Whether you’re a seasoned home cook or just finding your footing in the kitchen, this recipe meets you where you are. Let’s get into it!
Table of contents
Main Ingredients for the Best Honey Glazed Chicken
Good food starts with good ingredients. The beauty of this honey glazed chicken recipe is that you probably already have most of these on hand.
Here’s what you’ll need:
- Chicken breasts (3 medium, about 1½ lbs): The star of the show. Medium-sized breasts cook more evenly and stay juicy. You can also use chicken thighs if you prefer a richer flavor.
- All-purpose flour (¼ cup): This creates a light crust that helps the glaze cling to the chicken beautifully. Use cornstarch for a gluten-free version.
- Butter (4 tablespoons, divided): Gives the chicken a rich, golden sear and adds depth to the sauce. Olive oil works as a substitute.
- Garlic (4 cloves, minced): Fresh garlic is non-negotiable here. It’s the backbone of the glaze’s flavor.
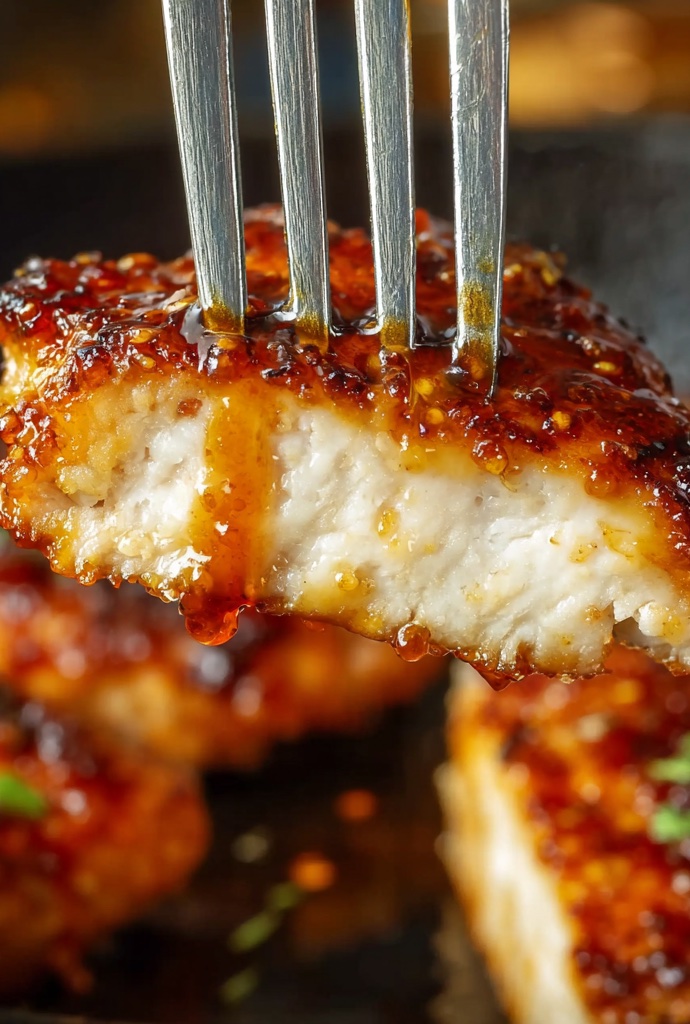
- Honey (⅓ cup): The real hero! It caramelizes as it cooks, giving that gorgeous sticky coating.
- Soy sauce (1 tablespoon): Adds savory depth and balances the sweetness perfectly.
- Apple cider vinegar (1½ tablespoons): A little acidity brightens everything up and cuts through the richness.
- Salt and black pepper: Season generously. Don’t be shy.
- Fresh chives: For a pop of color and freshness right before serving.
Additional Ingredients and Substitutions
One of the things I love most about cooking is making a recipe your own. This honey glazed chicken is wonderfully flexible.
Here are some great additions and swaps to consider:
- Maple syrup instead of honey: Works beautifully and gives the glaze a slightly deeper, more complex flavor. Perfect for fall vibes!
- Red pepper flakes: Add a pinch or two to the glaze if you like a little heat. Sweet and spicy is such a good combination.
- Lemon juice: Swap the apple cider vinegar for fresh lemon juice for a brighter, more citrusy finish.
- Fresh thyme or rosemary: Toss a couple of sprigs into the pan while the sauce simmers for an herby, aromatic twist.
- Dijon mustard (1 teaspoon): Stir it into the glaze for a subtle tang and extra body.
- Sesame seeds: Sprinkle on top at the end for a little crunch and a nod to Asian-inspired flavors.
- Green onions instead of chives: Just as fresh and colorful, and you likely have them already.
Don’t be afraid to play around. That’s where the fun is!
Expert Tips for Perfect Honey Glazed Chicken Every Time
I’ve made this honey glazed chicken more times than I can count. Here’s everything I’ve learned along the way.
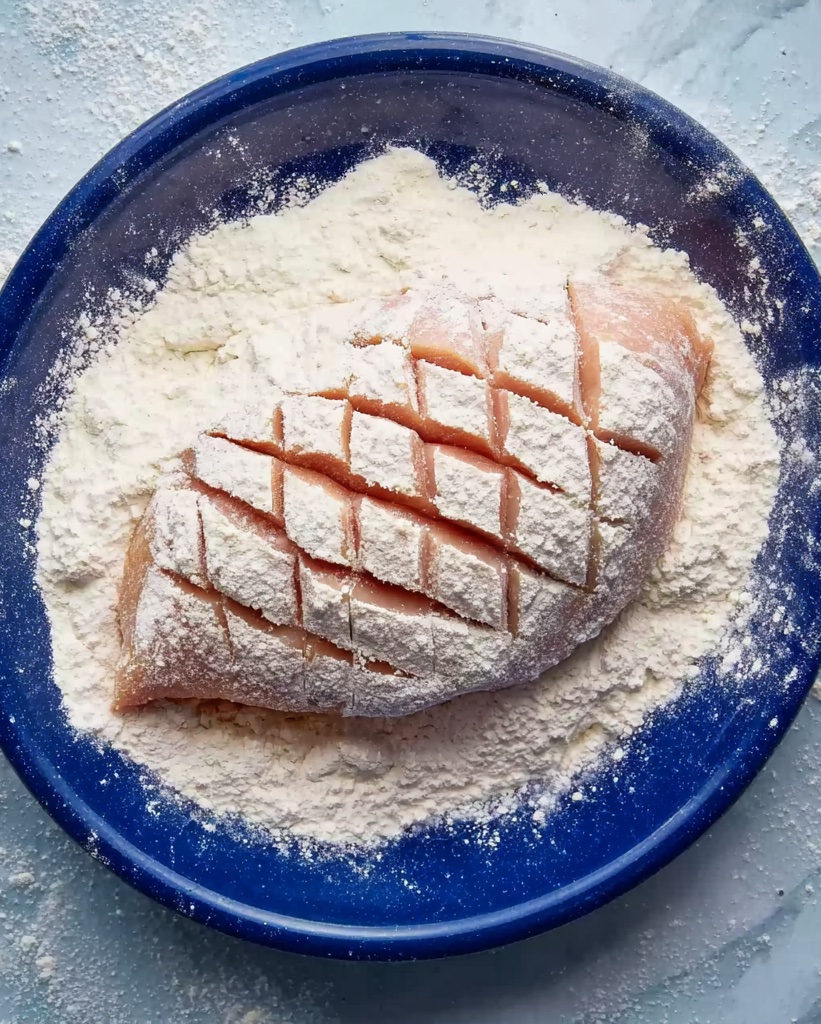
- Score the Chicken (Don’t Skip This!)
This is the one step I see people skip, and it makes a real difference. Use a sharp knife to cut a shallow diamond pattern into the top of each breast, about a third of the way through.
Why does this matter? It helps the flour and glaze sink into the meat rather than just sitting on top. You get more flavor in every single bite.
- Get Your Pan Hot Before Adding the Chicken
A cold pan equals soggy chicken. Let your skillet heat up over medium heat for a minute or two before adding the butter. You want it to sizzle the moment the chicken touches the surface.
- Don’t Move the Chicken Around
Once you place the chicken in the pan, leave it alone. I know it’s tempting to peek and poke, but patience pays off here. Let it develop that gorgeous golden crust before you flip it.
- Watch Your Honey Carefully
Honey can go from beautifully caramelized to burnt very quickly. Once you add it to the pan, keep the heat at medium and stay close. Stir and spoon the sauce over the chicken as it simmers.
- Use a Meat Thermometer
There’s no guessing game when you have a thermometer. The internal temperature should reach 165°F at the thickest part. This guarantees your chicken is cooked through and still juicy, never dry.
- Let It Rest Before Slicing
Give your chicken two to three minutes to rest after cooking. This allows the juices to redistribute, so you don’t lose all that flavor the moment you cut into it.
- Make Extra Sauce
Seriously, double the glaze. It’s incredible spooned over rice, roasted vegetables, or just soaked up with a crusty piece of bread. You will thank yourself later.
Step-by-Step Instructions
- Score the Chicken
Place your chicken breasts flat on a cutting board. Using a sharp knife, score the top surface in a shallow diamond pattern, cutting about ⅓ of the way through. Be careful not to cut all the way through.
- Season and Dredge
Season both sides of the chicken generously with salt and black pepper. Lightly press each breast into the flour, making sure it gets into all those scored grooves. Shake off any excess.
- Sear the Chicken
Heat a large skillet over medium heat. Melt 3 tablespoons of butter, swirling the pan gently. Add the chicken scored-side down and cook for 5 to 6 minutes until deeply golden. Flip and cook for another 4 minutes.
- Build the Glaze
Add the remaining tablespoon of butter and the minced garlic to the pan. Sauté for about 30 seconds until fragrant. Pour in the honey, soy sauce, and apple cider vinegar. Stir to combine.
- Simmer and Coat
Let the sauce bubble and simmer for 2 to 3 minutes, spooning it over the chicken continuously. The glaze will thicken and coat the chicken beautifully. Check that the internal temperature reads 165°F.
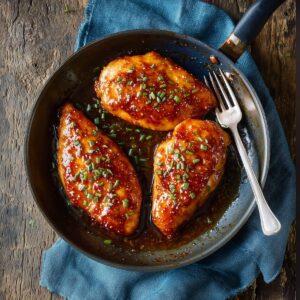
- Garnish and Serve
Remove from heat, scatter fresh chives over the top, and spoon any remaining sauce from the pan over the chicken. Serve warm and enjoy every bite.

Additional Guide: Variations and Serving Ideas
Once you’ve mastered the classic honey glazed chicken, it’s really fun to branch out a little.
Sheet Pan Version: Prefer a hands-off approach? After searing, transfer the chicken to a lined baking sheet, pour the glaze over the top, and finish in a 400°F oven for 10 to 12 minutes. Easy cleanup and just as delicious.
Air Fryer Option: Coat the chicken in the glaze and air fry at 375°F for 18 to 20 minutes, brushing with extra glaze halfway through. You’ll get a wonderfully sticky, slightly crisp exterior.
Serving suggestions:
- Fluffy white rice or jasmine rice to soak up all that sauce — or go all out and try it as a honey lime chicken and avocado rice stack for a fresh, restaurant-worthy presentation
- Roasted broccoli or green beans for a complete meal
- Creamy mashed potatoes for serious comfort food vibes
- A crisp green salad with a light vinaigrette to balance the richness
Meal prep tip: Honey glazed chicken stores beautifully in an airtight container in the fridge for up to 4 days. It actually tastes even better the next day once the flavors have had time to meld together.
FAQs About Honey Glazed Chicken
Why is my glaze not thickening?
This usually means the heat is too low or the sauce needs more time. Increase to medium-high briefly and keep stirring. The natural sugars in the honey glazed chicken sauce will caramelize and thicken as the liquid reduces.
Can I make this ahead of time?
Yes! You can make the full dish up to two days ahead. Store the chicken and sauce together in the fridge and reheat gently in a skillet over low heat, adding a splash of water if needed. Or if you love a truly hands-off approach, my slow cooker honey garlic chicken is basically made for meal prep. Just set it and forget it.
What if I don’t have apple cider vinegar?
White wine vinegar or fresh lemon juice are great substitutes. They both provide that gentle acidity that balances the sweetness so well.
Conclusion
There’s something really special about a recipe that’s simple to make but feels genuinely exciting to eat. This honey glazed chicken is exactly that.
It’s the recipe I turn to when I want to put something wonderful on the table without spending hours in the kitchen. It’s the dish my kids light up for. And it’s the one I bring out when I want to remind myself that great food doesn’t have to be complicated.
I hope you give it a try and make it your own. Maybe you’ll add a pinch of chili flakes, or swap in maple syrup, or pile it over a big bowl of rice with extra sauce. There’s no wrong way to enjoy it.
If you make this recipe, I’d love to hear how it turned out! Leave a comment below and let me know what your family thought. And don’t forget to share it with a friend who could use a little sweetness in their weeknight dinner routine.
Happy cooking, friends!
Honey Glazed Chicken
Equipment
- Large Skillet
- Meat Thermometer
- Cutting Board
- Sharp Knife
Ingredients
Chicken
- 3 chicken breasts medium, about 1½ lbs total
- salt and black pepper to taste
- 1/4 cup all-purpose flour or cornstarch for gluten-free
Honey Glaze
- 4 tbsp butter divided; or 3 tbsp olive oil
- 4 garlic cloves minced
- 1/3 cup honey or maple syrup
- 1 tbsp soy sauce use tamari for gluten-free
- 1 1/2 tbsp apple cider vinegar
Garnish
- fresh chives chopped
Instructions
- Score the Chicken: Place the chicken breasts on a cutting board and score the top in a shallow diamond pattern, cutting about ⅓ of the way through. Do not cut all the way through.
- Season and Dredge: Season both sides of the chicken generously with salt and black pepper. Lightly dredge in flour, pressing it into the scored grooves, then shake off the excess.
- Sear the Chicken: Set a large skillet over medium heat. Once hot, melt 3 tablespoons of butter, swirling the pan as it melts to prevent splatter. Add the chicken scored-side down and cook for 5 to 6 minutes until golden. Flip and cook another 4 minutes, or until nearly cooked through.
- Add Garlic and Glaze: Add the remaining 1 tablespoon of butter and the minced garlic to the pan. Sauté briefly until fragrant, about 30 seconds. Stir in the honey, soy sauce, and apple cider vinegar.
- Simmer and Coat: Let the sauce simmer for 2 to 3 minutes until thickened, spooning it continuously over the chicken as it cooks. The internal temperature at the thickest part of the chicken should reach 165°F (74°C).
- Garnish and Serve: Remove from heat. Garnish with freshly chopped chives and serve warm with the extra pan sauce spooned generously over the top.